Snickerdoodle Ice Cream Sandwiches Kids LOVE
Kids + Cookies + Ice Cream = SHEER JOY!!! Plus having the kiddos in the kitchen with their Nonna (me, that is) simply can’t be beat. Nothing beats teaching kids how to cook and making wonderful family memories to cherish. And these Snickerdoodle Ice Cream Sandwiches were perfect for a lesson on making one of my family’s favorite sweet treat!
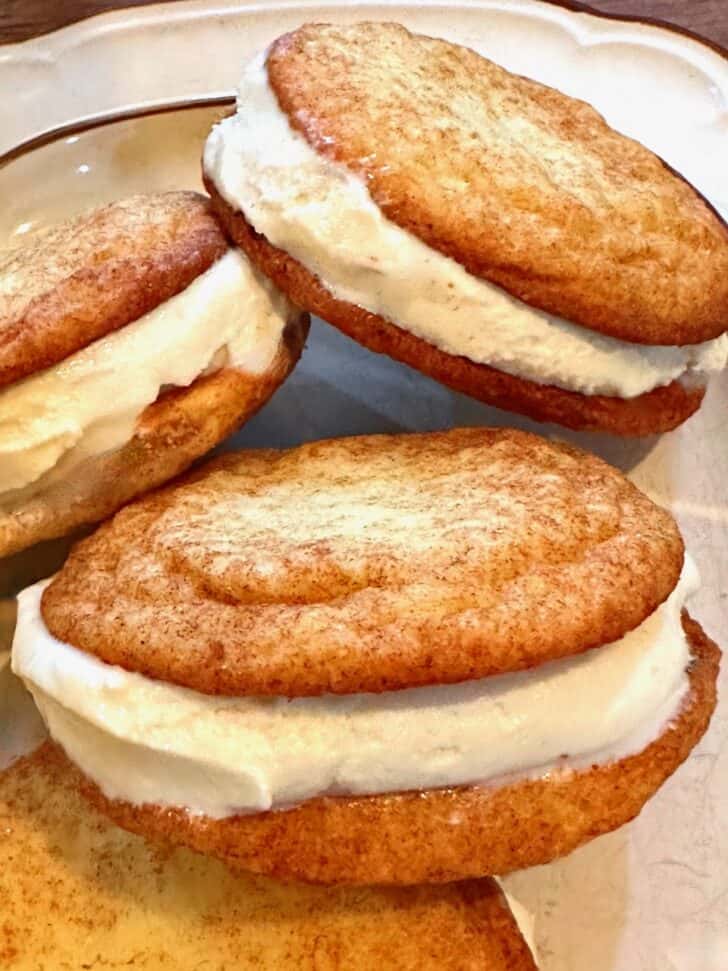
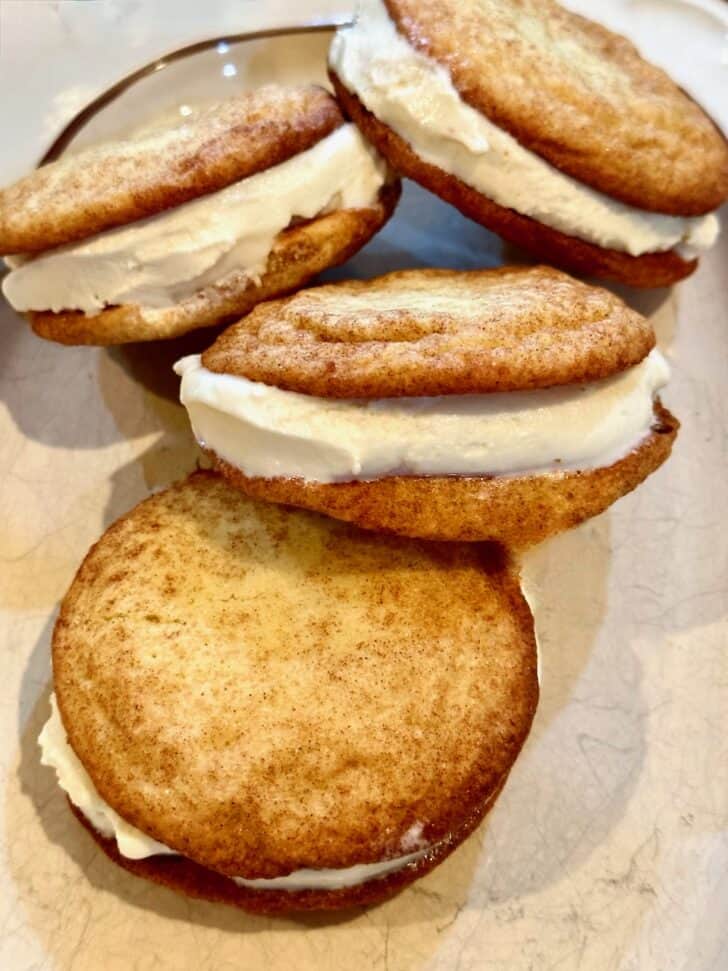
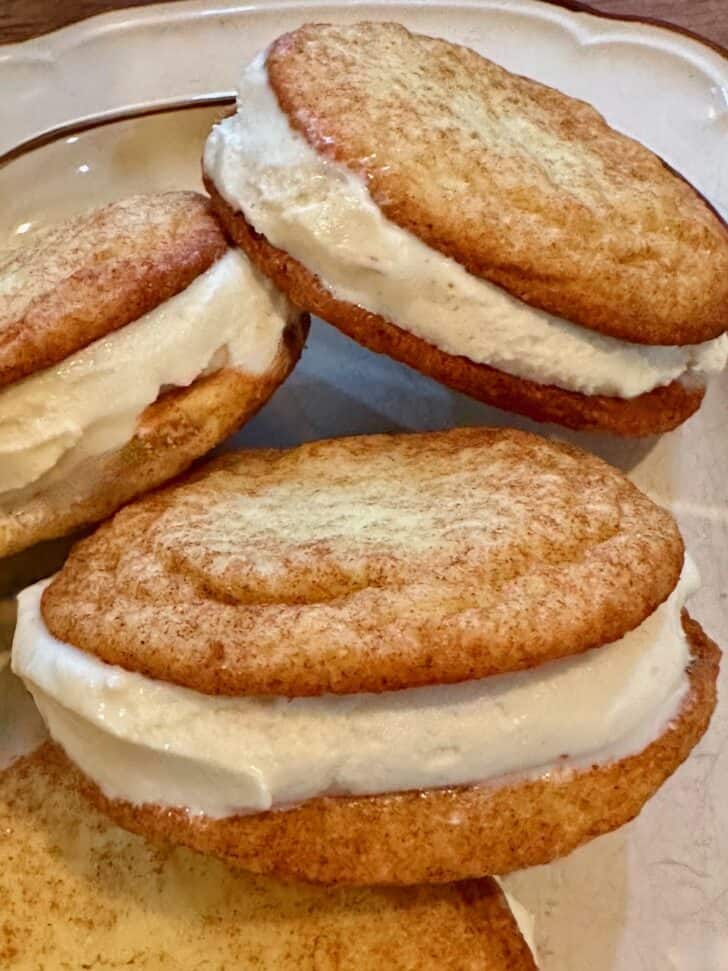
On their own, we could seriously pig out on snickerdoodles . . . year-round. Heck, not just for the holidays! Why wait that long to enjoy them? Plus, when the weather is warm, it’s so much fun to make homemade ice cream and then squish two chewy cookies around a big scoop of it.
Our little ones can really make some incredibly irresistable cookies. Just look at their little hands making the dough balls, covering them sugar and cinnamon, gently placing them on the baking sheets, and there you go! They have no patience whatsoever waiting during the baking though! (Neither do I, really!)
Decorate if you wish, but my 4 grandsons (3 are triplets) want to bite in instantly! Sprinkles will be for another time!

Truly special cookies indeed . . . of course, that secret ingredient is LOVE in the kitchen! What perfect treats to share with their friends when they come over to play? These are perfect to make ahead and keep in the freezer to grab for play dates . . . or for any time, really! You’ll be sure to make some sweet tooths mighty happy!
So let’s get to the kitchen, shall we?
First things first!
First of all, my family has not one, but TWO slightly different recipes for Snickerdoodles. The recipe that I prefer creates very lofty, fluffy, pillowy soft cookies that in my opinion, stay that way for several days.
The recipe that my husband prefers produces more flat and chewy cookies. In my humblest opinion, these become more firm as time passes. Yet, truthfully, this recipe works best for Snickerdoodle Ice Cream Sandwiches. That’s simply because they’re a little bit easier to bite into (for little mouths especially) and they can stack better. The flavors of each are identical and delicious.
Both of them have a cinnamony flavor that can’t be beaten. In fact, why not make both recipes and enjoy each version? Now we’re talking!
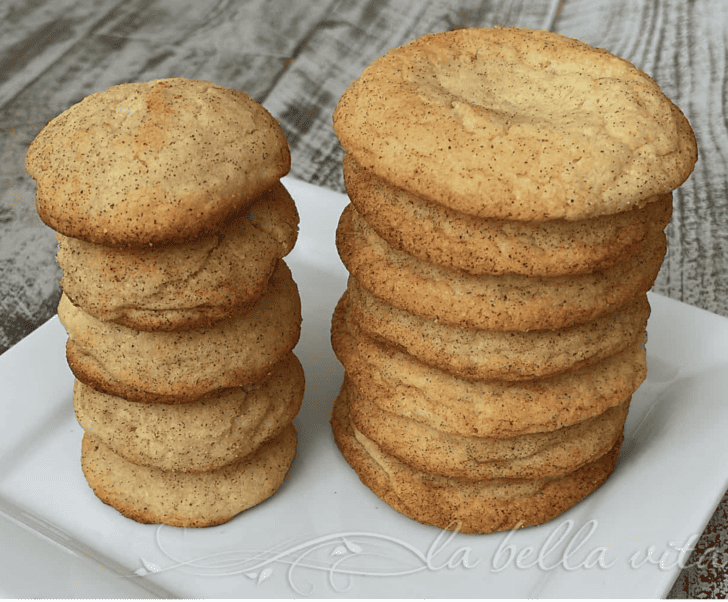
The photo below shows the difference: The cookies on the left were made with the fluffier cookie recipe that I prefer and the stack of cookies on the right were prepared with my husband’s favorite Snickerdoodle recipe. The left stack is more narrow, but taller and loftier. And using the SAME amount of cake dough/batter, the stack on the right is wider and flatter. What do you think caused this difference?
HERE’s What Creates The DIFFERENCE:
The stack on the left (my favorite of all time now):
- adds ONE TEASPOON of BAKING POWDER instead of NONE used (on the right)
- uses ONE-FOURTH TEASPOON of BAKING SODA instead of ONE TEASPOON used (on the right)
The inside of these cookies was still perfect (“per-fetto” as we say in Italian). Soft. Tender. Chewy. They are just more of a good thing.
Next: Make Your Homemade Ice Cream Now
Cuisinart Recipe
For the best results, freeze your ice cream maker container first thing in the morning to freeze all day OR set it in the freezer overnight. Actually, we keep it in the freezer at all times when not making ice cream, because it’s ready whenever we want some fresh ice cream!
Once you’ve made the ice cream and you’ve had it in the freezer to firm up nicely, it’s time to bake the Snickerdoodles!
So here’s what you need from the pantry or to pick up at the store:
You’ll need the following ingredients:
- Unsalted Butter: Softened to room temperature so that it mixes well with all of the ingredients.
- Granulated Sugar: A must to make snickerdoodles!
- Eggs: To bind all ingredients together.
- Vanilla Extract: Adds an extra flavor dimension that compliments the sweet taste.
- All-Purpose Flour: Lightly fluff and scoop your flour into a measuring cup.
- Cream of Tartar: For an extra soft, chewy texture and subtle tangy snickerdoodle flavor.
- Salt: Enhances the flavors of the other ingredients.
- Baking Soda: Helps the cookies rise and prevents them from flattening out too much.
- Granulated Sugar and Cinnamon: Mixture Coats the cookie dough balls before baking for the unique Snickerdoodle flavor finish.
- Optional Decorations: Colorful sprinkles or butterscotch/caramel chips.
How to Make Snickerdoodle Ice Cream Sandwiches
Here’s a simple overview of the recipe. The recipe card at the bottom of this post gives you the full step-by-step instructions.
The Cookie Dough
- Cream butter and sugars with a hand mixer or in the bowl of your stand mixer. Add the egg, corn syrup, vanilla extract, and almond extract. Mix until well combined.
- Add the flour, baking soda, salt, and oats and continue to mix until well combined.
- Stir in the chocolate chips with a spoon.
Bake the Cookies
- Using a medium cookie scoop, scoop the dough and roll it into neat balls. Place the dough balls on a parchment paper lined or ungreased cookie sheet, leaving at least 2-inches in between. These cookies are meant to spread.
- Bake in a preheated 375 degree F oven for 8 to 9 minutes, or until the bottoms are lightly golden brown. Remove from the oven and allow the cookies to cool on the baking sheet for a few minutes, then transfer to a wire rack to cool completely.
Assemble and Decorate the Cookie Ice Cream Sandwiches
- Flip one of the cookies upside down and place a scoop of slightly softened ice cream on its flat side. Press the ice cream down a little with the back of a spoon or ice cream scoop. Place a second cookie on top of the ice cream and press down so that ice cream reaches edges.
- Sprinkle your decoration of choice around the edges of the ice cream, pressing lightly with your fingers to make it stick if necessary. Quickly wrap the ice cream cookie in plastic wrap and place in the freezer. Now repeat this about 19 more times.
Ingredient Notes
- Butter – Salted butter softened at room temperature.
- Sugar –
- Flavoring – Pure vanilla extract
- Dry ingredients -All-purpose flour, baking soda, and salt.
- Ice cream – The flavor possibilities are endless! Cookie Ice Cream Sandwiches are delicious with classic vanilla ice cream. But have some fun and try them with chocolate, butter pecan, cookies and cream, coffee, or more exotic flavors like coconut or cheesecake. Or use your favorite ice cream flavor.
Tips for the Best Cookie Ice Cream Sandwiches
Size matters: Use a cookie scoop to ensure the cookies will be the same size and will line up properly when assembled. A medium cookie scoop holds approximately 1 ½ tablespoons of dough which is the perfect size for creating ice cream sandwiches that are easy to handle and eat.
Cool the cookies: After baking the cookies, allow them to cool completely on wire racks before assembling the ice cream sandwiches. You can even place them in the refrigerator for a short time to firm them up.
Soften the ice cream: Take the ice cream out of the freezer a few minutes before assembling the sandwiches. This will make it easier to spread onto the cookies and create a smooth, even layer.
Freeze the sandwiches: After assembling and wrapping, freeze them for at least 1 to 2 hours or until the ice cream is firm.
Serving: When you’re ready to serve, remove the ice cream sandwiches from the freezer and let them sit for a minute or two to soften slightly. This makes them easier to bite into.
Storage Tips
- Wrap Individually: For easier storage and serving, wrap each ice cream sandwich individually in plastic wrap or parchment paper before placing them in the freezer. This prevents them from sticking together and helps maintain freshness. They should stay fresh and tasty for up to 2 to 3 months.
- Airtight Container: You can place the wrapped Cookie Ice Cream Sandwiches in freezer-safe plastic storage bags to make them even more airtight.
HOW TO MAKE THE BEST COOKIE ICE CREAM SANDWICHES RECIPES
- Ingredients you’ll need to make homemade Cookie Ice Cream Sandwiches: All purpose flour, baking powder, baking soda, salt, butter, light brown sugar, vanilla extract, semi sweet or milk chocolate baking chips, vanilla ice cream.
- Kitchen tools you’ll need: One large bowl, one medium bowl, whisk, measuring cups and spoons, baking sheets, ice cream scoop, cookie scoop, cookie spatula and cooling rack.
- You should end up with at least 8 ice cream sandwiches but this could vary depending on how you divide the cookie dough. You can make them slightly smaller or larger, it’s your call.
- Larger cookies will make less ice cream sandwiches and smaller cookies will make more. It all depends on the size of the cookie dough balls. You have creative freedom to adapt according to the amount of servings that you need.
- You could add ½ cup roughly chopped nuts to the cookie dough, if desired.
- It is important to chill the cookies in the freezer, not on the counter or in the fridge when planning to serve these immediately. Doing it this way the cookies cool quickly and will reach a temperature that’s closer to the ice cream, which prevents the ice cream from melting once sandwiched together.
- These cookie sandwiches are tasty when the ice cream is sprinkled with mini chocolate chips prior to pressing the second cookie on top. You can also fully assemble and roll the sides of the ice cream in mini chocolate chips, nuts, colorful sprinkles or toffee bits.
- You can also switch up the flavor of ice cream being used to suit your fancy. Strawberry, chocolate, caramel or any ice cream flavor that pairs well with chocolate chip cookies.
- Using only brown sugar gives the cookies a little more moisture and results in a cookie that’s more chewy. This will also help keep the cookies from getting rock hard when they cool in the freezer.
- Because of the ice cream, these cookies should be served immediately after assembling. If you’re not serving them immediately, you can bake the cookies in advance then store them in the refrigerator until you’re ready to add the ice cream.
- Alternatively, you can add the ice cream and store the sandwiches in the freezer for up to 2 weeks tightly wrapped in freezer wrap or in an airtight container separated with wax paper.
Helpful Kitchen Items:
FOR THE SNICKERDOODLES
- All-purpose flour – The base of the cookie dough.
- Cream of tartar – To give the cookies their iconic tart flavor.
- Baking soda – To lift and lighten.
- Salt – All baked goods need a little.
- Granulated sugar – To sweeten the cookies and create the sugary crust on the outside.
- Unsalted butter – Softened. For a rich taste and texture.
- Eggs – To bind the dough together.
- Cinnamon – For the cinnamon sugar coating on the outside of each cookie.
Snickerdoodle Cookies Recipe Substitutions
- Try using Nutella chocolate hazelnut spread as the filling between the cookies!
MORE AMAZing COOKIES to make
hot out of the oven, kissed with spice.
(If you want to make the fluffier version seen below, chill the dough for one hour before baking.)
This post may contain affiliate links. As an Amazon Associate, I earn from qualifying purchases. Read our disclosure policy.
HOMEMADE VANILLA ICE CREAM:
Cuisinart Ice Creaqm Maker
Fresh Ice Cream Freeaer Containers
THANKS FOR VISITING COME BACK SOON!
DISCLOSURE ~ IF A PURCHASE IS MADE USING ONE OF THE AFFILIATE LINKS ON THIS WEBSITE WE MAY EARN A SMALL COMMISSION AT NO ADDITIONAL COST TO YOU. THANK YOU!
Now, here’s the official instructions from Cuisinart, the company itself, so the information is absolutey correct. We’ve had our two Cusinarts for years now and these instructions are super easy and perfect. By the way, the TWO Cuisinarts we have incude the first model for harder (American) ice ctrerem and the second model is for soft-serve (ie Dairy Queen and McDonald’s) ice cream or gelato.